Ledger Hardware Wallet
Overview
As an alternative to storing your password-encrypted private key in a browser wallet extension, a Ledger hardware wallet can be used to manage your private key offline. Ledger devices are hardware wallets that keep your secret secured on a physical device that does not expose it to your computer or the internet.
Ledger apps are compatible with the Ledger Nano S+, Nano X, Flex and Stax devices. (The discontinued Ledger Nano S is not recommended — it lacks the memory to support setting session keys and the full transaction set.)
From Polymesh v8, the chain supports Merkleized metadata signing (the CheckMetadataHash transaction extension — see the chain changelog for the technical detail), which lets a Ledger device verify and display full, human-readable Polymesh transaction details even when using a generic app. This means you can now use Polymesh with more than one Ledger application — see Choosing a Ledger App below. It also means smoother chain upgrades going forward: because the device checks transaction details against the runtime's own metadata rather than a fixed set of transaction formats built into the app, newly added or changed transaction types are typically understood and displayed correctly without requiring a Ledger app update.
Choosing a Ledger App
Three Ledger applications work with Polymesh, listed under these names in the Ledger Live app catalog:
- Polymesh (recommended) — the Polymesh-branded application, developed by Zondax and published at LedgerHQ/app-polymesh. It maintains the dedicated Polymesh key derivation path (SLIP-44 coin type
595, i.e. paths of the formm/44'/595'/…), so the addresses it produces match those generated by the legacy Polymesh ledger app and other Polymesh-native tooling. It also supports the v8 Merkleized-metadata signing described above. This is the preferred app for most users, and required if you want your Ledger addresses to line up with existing Polymesh keys. - Polkadot (DOT) — the generic Polkadot application. Thanks to v8's Merkleized-metadata support, it can sign and clearly display Polymesh transactions even though it isn't Polymesh-specific. It is a good option if you are coming into the ecosystem fresh, or already manage Polkadot-ecosystem accounts with it and prefer a single app. It uses the Polkadot derivation path (SLIP-44 coin type
354, i.e. paths of the formm/44'/354'/…), so it derives different addresses from the same recovery phrase than the Polymesh app does — see the warning below. - Polkadot Migration — a general-purpose Ledger app that isn't locked to one chain's SLIP-44 coin type; wallets and tooling can direct it to derive keys for whichever coin type they specify. It exists ecosystem-wide to help users of chain-specific Ledger apps migrate to the generic Polkadot app. Because Polymesh keeps its own dedicated, Merkleized-metadata-compatible app, most Polymesh users don't need this app — use the Polymesh app directly instead.
The Polymesh app (coin type 595) and the generic Polkadot (DOT) app (coin type 354) use different derivation paths, so the same recovery phrase produces different addresses under each. If you set up a key under one app and later connect using the other, you will see different accounts and may think your funds are missing — they are safe, but under the other app's addresses. Decide which app you will use up front, and stick with it; the wallet setting described below must match the app you have open on the device.
The addresses your Ledger produces still need to be onboarded like any other key: a DID is only required for identity and asset related transactions, not for basic POLYX transfers or staking. See Onboarding.
Requirements
Here is a list of what you will need before starting:
- A Ledger Nano S+, X, Flex or Stax device (the discontinued Nano S is not recommended).
- The latest firmware installed.
- Ledger Live is installed and updated to the latest version.
- The Polymesh Wallet browser extension - this can be downloaded from the Chrome Store.
- Or a Chromium-based web browser to access the Polymesh App.
Other Substrate based wallets may support importing of Polymesh keys from Ledger devices. Refer to the wallets documentation to determine if Ledger devices are supported.
Installing the Ledger Application on Your Device
- Open the "My Ledger" tab in Ledger Live.
- Connect and unlock your Ledger device.
- Allow the Ledger Live to connect by confirming on your device.
- Search the app catalog for the app you want to use and select "Install":
- Polymesh — the recommended, Polymesh-branded app (coin type
595). - Polkadot (DOT) — the generic Polkadot app, if you prefer to use it (coin type
354). - Polkadot Migration — not needed for typical Polymesh use; see Choosing a Ledger App above.
- Polymesh — the recommended, Polymesh-branded app (coin type
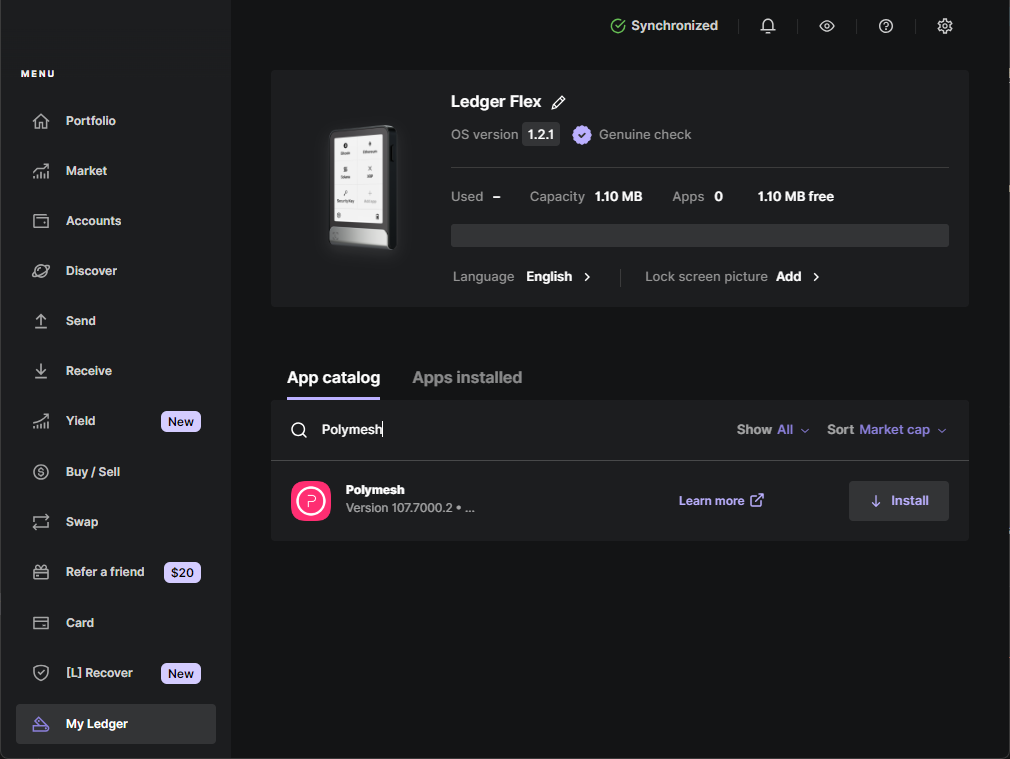
Whichever app you installed and set up your key with is the one you must open on the device when signing. If you set up your key under the Polymesh app, open the Polymesh app to sign; if you set it up under Polkadot (DOT), open that one. Opening a different app will surface different addresses (see the derivation-path warning above).
Using via the Polymesh Wallet
The Polymesh Wallet extension supports signing with Ledger Hardware Wallets. This allows you to use your Ledger to sign transactions in any application compatible with the Polymesh wallet.
Selecting a Ledger App in the Wallet
The wallet needs to know which Ledger app you're using so it derives and signs with the matching addresses. To choose:
-
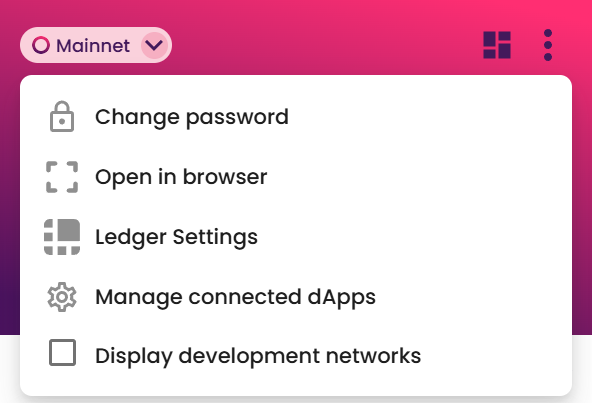
Open the Polymesh Wallet extension and click the 3-dot menu in the upper right corner.
-
Select Ledger Settings.
-
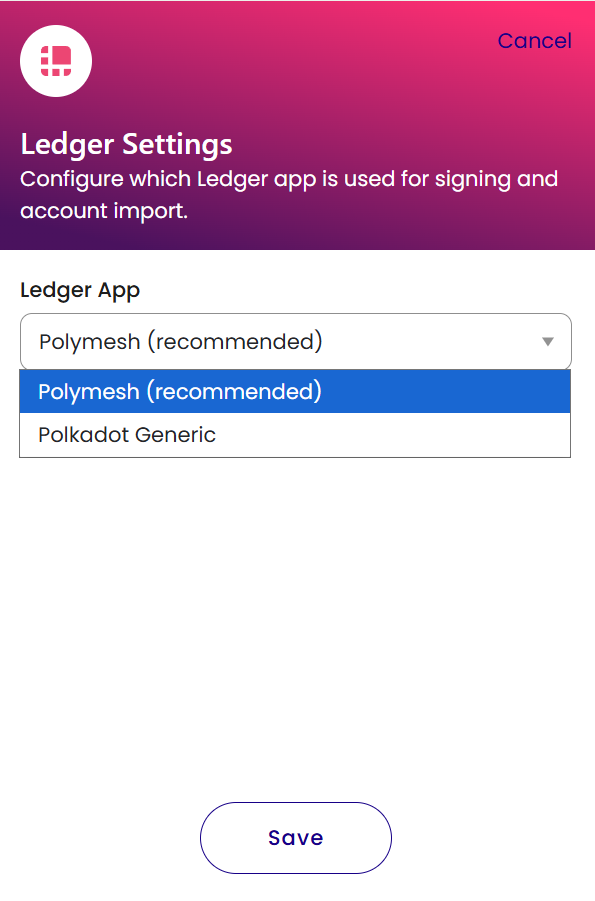
In the Ledger App dropdown, choose either Polymesh (recommended) or Polkadot Generic — matching whichever app you installed and intend to use on your device.
-
Click Save.
This setting only applies when connected to a network running Polymesh v8 or later (spec_version 8,000,000 and above). If you connect to a network on an older spec version, the wallet automatically falls back to the original, pre-v8 dedicated Polymesh Ledger app (the "Legacy" app) regardless of what's selected here.
Once installed, open the app you set up your key with (for most users, the Polymesh app) on your Ledger device before connecting.
If you don't enter the relevant Ledger app first, you'll see a screen saying "Your Ledger is not connected."
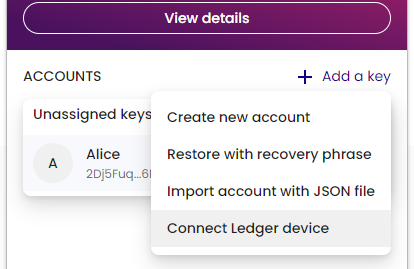
In the Polymesh wallet, instead of selecting Create new account, you can select Connect your Ledger when setting up your first wallet or click + Add a key and then Connect Ledger device if you've previously set up a key.
If prompted by a browser popup, select your hardware wallet and click “Connect.”
You can then name your Ledger key and select Continue to import it to your wallet. The Advanced settings on the import screen let you choose an alternate derivation path, enabling multiple keys from the same Ledger device. The default for the first key import is Account type 0, Address index 0 - think of it as a formula for generating child keys. Subsequent key imports will increment the Account type automatically to use a different key from the same device.
If using a custom derivation path it is important to remember the type and index used so you can reconnect it should it become disconnected.
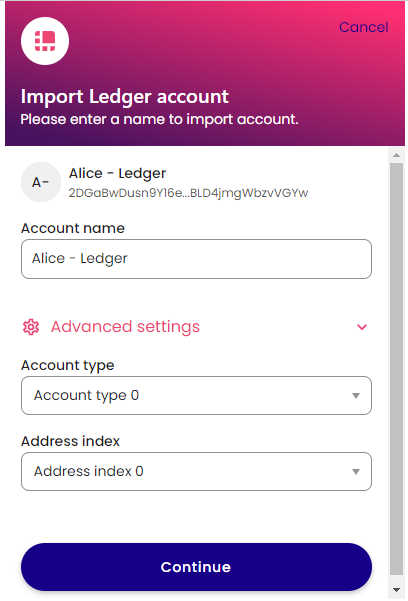
Now, when signing transactions with this key, you must connect your Ledger, open the app you set up the key with (the Polymesh app for most users), and you'll be prompted to confirm the transaction with your Ledger device.
When imported, Ledger keys are assigned the genesis hash of the chain selected in the wallet at the time of import (i.e., Mainnet or Testnet). If the key is intended for use on Mainnet ensure mainnet is selected in the top left corner of the wallet before adding a Ledger key. It's best not to share keys across Mainnet and Testnet, as some dApps may filter by genesis hash and not display keys imported for Testnet on a Mainnet instance, and vice versa.
Using via the Polymesh App
Some applications may support connecting your ledger device directly without the need for a compatible browser extension. One example is the Polymesh App which is a Polymesh specific fork of the Polkadot.js App.
Loading Your Account
The functionality to use a Ledger device directly is currently gated behind a feature setting that you will need to turn on.
To turn on support for Ledger devices, go to the Settings tab in the Polymesh App. Find the option for attaching Ledger devices and switch the option from the default "Do not attach Ledger devices" to "Attach Ledger via WebUSB".
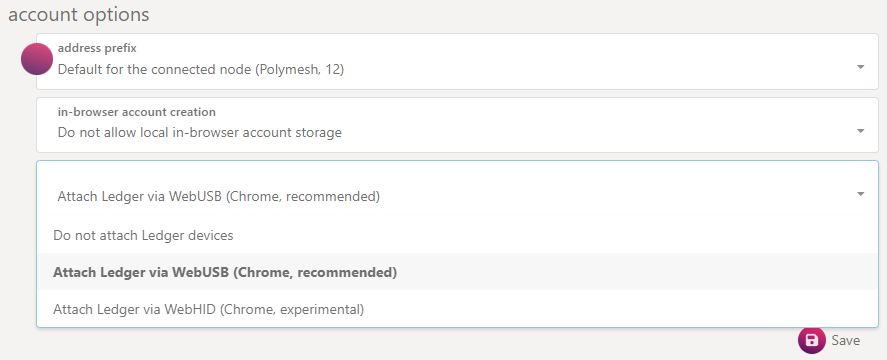
Click "Save" to keep your settings.
Now when you go to the Accounts tab you will see a new button that says "From Ledger".
Ensure that:
- The Ledger device connected to your computer
- The Ledger device is unlocked
- The relevant Ledger application (the Polymesh app for most users) is open on the device.
- Other apps that may be using the Ledger Device, such as Ledger Live are closed.
Once the above has been confirmed click the From Ledger button.

A popup will appear asking you to select an key name and derivation path.
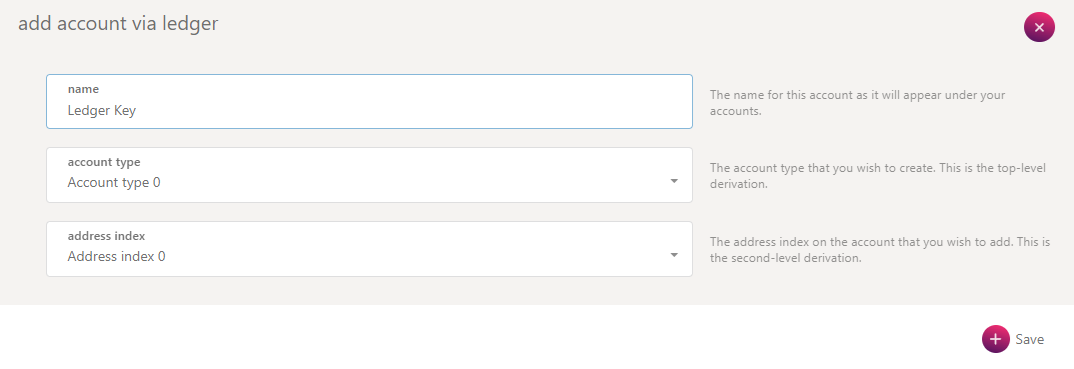
The first option lets you select an account type. You can have multiple keys on a single Ledger device. The second dropdown lets you pick a index. The combination of both represent the key derivation path. If in doubt, pick the first option for both. 0 / 0 is a good default.
Once you click "Save" to confirm your selection, you may be prompted to confirm the USB connection through a popup like the one below when adding the Ledger device for the first time:
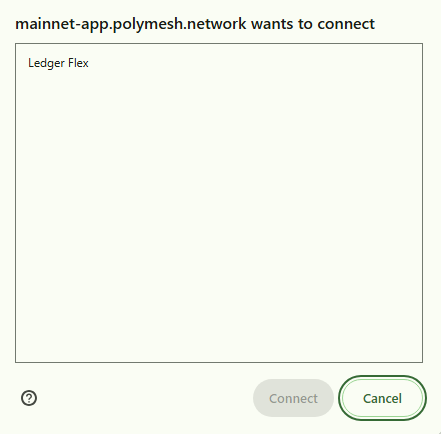
Select your device from the list of devices and then click the "Connect" button.
You should now see the new key listed on the accounts page under the "hardware" section.
You can now use this key to interact with Polymesh on Polymesh App. If you select your Ledger key when submitting a transaction, you will be prompted to sign it on your Ledger. The Ledger device must be attached when submitting a transaction from your Ledger key.
Links
- Ledger Polymesh App GitHub — the published Polymesh Ledger app, developed by Zondax
- Ledger Polymesh App support page
- Polymesh Support Requests